Tuesday, August 21, 2012

OH Sugar!

So by now I am sure you have heard all the benefits of what a sugar scrub can do for you... wait you haven't? Well let me fill you in!


Sugar scrubs are a great way to pamper yourself.  It has a soothing feeling and the sugar is good for even sensitive skin.  Now considering that you have sensitive skin then you will need to consider what other ingredients are in your scrub.   But rest assured that every product that goes into my store will always be tested before its posted!


Now back to the sugar scrub.  With the sugar, Turbinado Sugar, it is a great small grain exfoliator. It is small, will gently dissolve and will not cause problems with drains, septic systems or campers' systems.  It is natural and has its own great properties.  Turbinado Sugar retains the mineral and vitamins present in sugarcane juice, and also includes phosphorus, calcium, magnesium, potassium and iron.Turbinado sugar is also known as cane sugar or raw sugar. How is Turbinado sugar made?  It comes from the first pressing of the sugar cane.  


 As with any scrub there must be an oil.  Many water soluble oils are suitable for scrubs.  Most use an oil that will disperse into the skin and feel soft and smooth.  The best oils are those that absorb into the skin, such as oils like Apricot Kernel oil or Grapeseed Oil. The only set back is that can cause your shower to become slippery. Take care when stepping out of the shower or tub after use of a scrub.  


Papaya Milk Sugar Scrub
There are many other additives you can use in your sugar scrub.  With the sugar it acts as a polish.  It will leave the skin smooth and soft.  But if you add coffee, for example, it has been known that coffee firms up the cellulite in the skin.  So all this time I have been drinking it, when I  should have been showering with it! who knew??
Vanilla Mac Nut Coffee & Sugar Scrub

Also there is the cucumber scrub. As cucumber and the skin share the same level of hydrogen, it becomes easier for cucumber to mask all the problem areas. It helps in soothing and softening your skin which can get you relaxed in no time. It has become part of daily beauty product into face packs, facials, juice and many other things which can affect your skin.
It also has a nice cooling effect on the skin.  You can find a great Cucumber and Green Tea sugar scrub here.


As with other fragrances, Lemon is uplifting and refreshing, mint helps with circulation, and fruit .... well fruit just smells delicious!  So just be sure you are not hungry when choosing the scrub for you!  I also offer an amazing sugar scrub for your lips.  Gentle exfoliation of the lips with an amazing moisturizer mixed in.  Just apply like a lip balm and lick off the sugar.  Who wouldn't want that? 

You can find great sugar scrubs in my shop, along with other great items to pamper your self with at Plum Valley Notions.


Cranberry  and Shea Butter Sugar Scrub
*Avoid use on any cuts or delicate areas. Do not exfoliate if skin is sunburned or irritated for any reason. Be careful not to fall on wet or slippery areas caused by using the scrub. Avoid using all body polishes on the face. 

Thursday, August 16, 2012

Raspberries, Raspberries, and More.... you guessed it!

 I love going out into the garden in the morning and snacking on berries while I water.  Today I decided to pick a few more raspberries out of the garden to save myself from disaster come Monday.  5 cups of berries!  not expecting that, over 1 1/2 pounds of berries!


 So with what I had frozen from last week, and a few blackberries I decided to make another small batch of raspberry preserves.  


I followed the Ball Blue Book of Canning and started with the following ingredients:
2 lb rasbperrie's
4 cups sugar ( started with only two cups here...)

Combine berries and sugar, let sand until juices start to flow, 10 minutes. Slowly bring to a boil, stirring until sugar dissolves.  Once dissolved I taste it to see if I need more sugar or not.  I add it in 1/2 cup at a time until desired sweetness.


As mixture thickens, stir frequently to prevent sticking. Boil rapidly to almost gelling point. Remove from heat, and skim foam off if necessary. ladle hot preserves into jars leaving 1/4" headspace. Adjust two piece caps. Process 15 minutes in boiling-water canner.

So, with the sweetness of my berries, and the less sugar, I had to cook a little longer depending on the natural sugars of the berries to come out and help form the gelling phase.  Not too much longer but boy is it worth it! A great spread with a wonderful flavor and bright color!


 Now, if I only had a few more crackers because all I have is raspberries, raspberries and more.... you guessed it!  Raspberries!!


Sunday, August 12, 2012

A little canning goes a long way

Fresh out of our garden
With the recent incline of warm weather in Southern Oregon, a few of my garden items have shot into high speed!  One was zucchini.... it will not stop!  But luckily I have found some great recipes for that!
But int he meantime I have two other items that seem to creeping up faster and faster; Green Beans and Raspberries!


We have taken out about 1/4 of the bean plants out of the garden, and I pick raspberries every other day and get about 3-4 cups per average.  I have been freezing the berries until now, and have made the most delicious jam ever!  It is a great combo of peaches, raspberries, blackberries and a few rogue blueberries!  I love it!  But that is a story for another day.......

As for the beans, all they got was a little hot water and some salt, but none the less they turned out great!  A blank canvas to create a masterpiece in the future.

Little helpful hints when canning:

1. don't be afraid to can!  you can can just about everything! ("Can, can you do the can can, I can do the can, can, can you do the can? Oh yes I can, I can, I can"..... as sung by that great duo of mine to the tune of The Can-Can.... my girls!)
Photo found on Google Images


2.  Be sure to set aside plenty of time.  You cannot rush this process, and when you do, your results don't turn out the same.

3.  Pressure canners are not the devil!!!  (ok an exaggeration but they can seem scary!)  JUST REMEMBER TO RESPECT THE PRESSURE CANNER!!

4. Don't forget to take into consideration of high altitude changes.

Basic instructions on canning fresh green beans:
Yumm!  Grean Beans!!
Wash beans thoroughly.  Cut into 1 1/2-2" pieces.  I always wash again... even though you may have them washed four times from the garden, there is always one little bug that seems to get by you and four other cutters!
Before starting I always put my lids and rims in hot water and let them simmer until I am ready. I believe this is also suggested in most canning books.
Fill jars (I use quarts most the time because there are six of us!) within 1 1/2" from top with your beans. I shake the beans down to get a few more in if possible. Cover the beans with boiling water leaving 1" head space.  Add 1tsp salt to beans.  Take a knife and slide it down through the beans to remove air bubbles. Then take a clean cloth, wipe the rim down and the threads so there is no food on the jar when closing them up.  Close up tightly.  My books say "finger tight" but I always put one more firm twist so nothing gets out!

At this point most canning in pressure canners will vary.  For quarts, you would can for 25 minutes at 11 pounds of pressure.  But keep in mind this is for up to about 3500 ft above sea level.  I have to increase my pressure to 12 and cook about the same time.  For pints, same pressure but you process only 20 minutes.
*with pressure canners, your time processing does not start until you hit your pressure level.  This could take a half hour or more before it gets there.  I am no expert so please refer to your canning manual for specific details!!!

You can spice up your beans and add different flavor enhancers such as garlic, red peppers, onions and more!  The possibilities are endless!

Fresh Bush Beans Canned and ready for storage

Next project: 
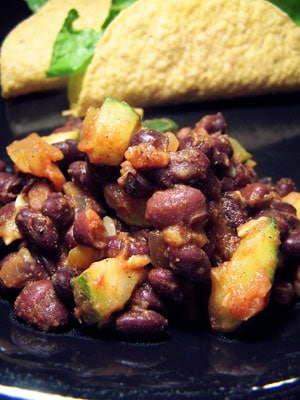
http://greenlitebites.com/2008/01/20/spicy-black-beans-and-zucchini/
Going to take this recipe with Black beans, zucchini, and salsa and can it to make a great bean dip for any occasion! It is also an amazing replacement for a meat filling in soft taco's!   All I will have to do is open, heat and serve!